Friday 19 August 2016

Painted Panda Canvas

Mom and Daughter Art Project

Boo and I were inspired by some canvas art for sale at our local Homesense (similar to Homegoods in the US).
Boo's favourite animals are Giant Panda, so we had to use our local Zoo's panda cubs. We used an image of 9 month old Jia PanPan and Jia YueYue.  Their names translate to Canadian Hope and Canadian Joy.

Here is our tutorial:

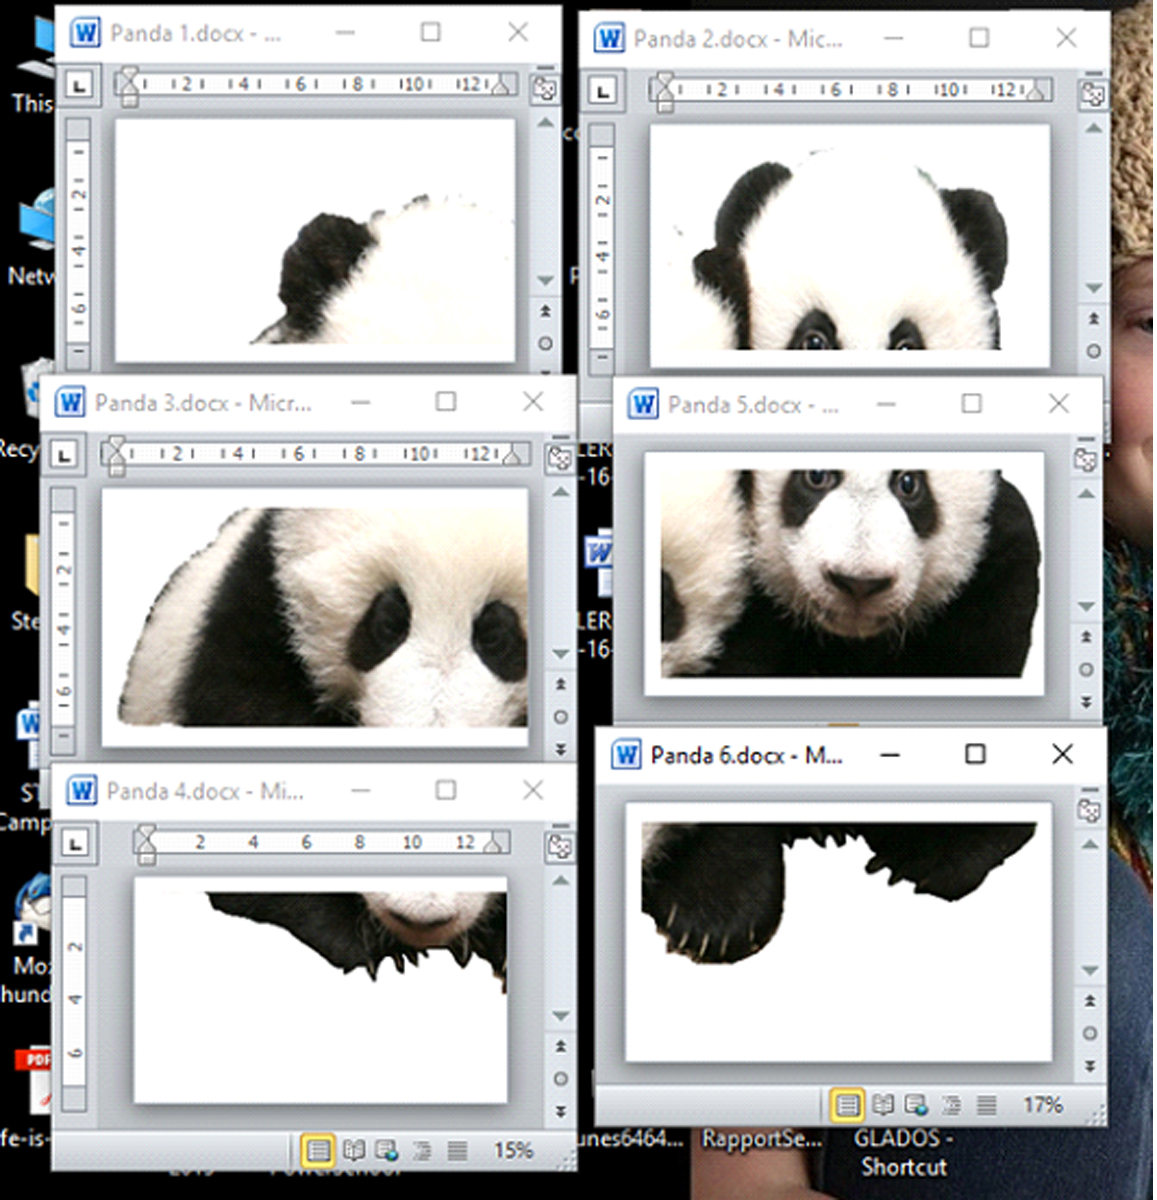
In Photoshop I removed the background from the origianl Panda cub image.  The image is from an online media website.

Below is our first printed attempt.  The image wasn't large enough on 3 sheets so I cropped them into 6 sheets of legal size paper instead. 
Printing Instructions:
I inserted the image into MS Word choosing "legal" paper size in the Page Layout tab and landscape orientation. I re-sized and cropped the image allowing for some image overlap and saved it into 6 files.  Then printed each segment onto legal paper on a black and white laser printer.
Using scissors we trimmed the printed panda sheets, matched up the segments then taped it together on the back side using minimal amounts of masking tape.  

3 sheets of patterned scrapbook paper fit perfectly across the canvas allowing for a bit of overlap.  

To prevent the scrapbook paper colour accidnetly bleeding through the panda image once glued, we traced then cut out the panda outline on the scrapbook paper before gluing it onto the canvas.  We used Mod Podge adhesive (Tip: less paper curling happens if the Mod Podge is added to the canvas not the paper - once dry the bubbles will recess.)
We did not add Mod Podge overtop of the glued and dried Panda image as per the Mod Podge instructions.  Instead we painted a layer of Liquitex Clear Gesso to seal and add structural integrity to the laser printed paper.  

We also added some additional scrapbook remnants to make the cubs look as if they are leaning over the painted Magnta banner.
Start painting in layers working from the outside of the body inward.  The paint stroke direction is the opposite, from the body outward. 

Feather Stroke: lighten up on the brush pressure in an outward motion, the paint stroke will strart thicker and 

Let each layer dry before moving on the next layer or colour in the gradiation. Overlap each layer slightly using a feathering stroke (lighten up on the brush pressure in an outward motion).
Panda Close Up
The bamboo image is from The Craft Chop - tree frame that I cropped in Sure Cuts A Lot.

Friday 5 August 2016

Upcycled Stair Rails / Spindles

What to do when gifted a large batch of wooden stair rails / spindles?

I think practically every one knows that I am a crazy craft nut, so much so that even my neighbours are on the look out for items for me to re-purpose.  My neighbour across the road is a contractor and was doing a porch rebuild.  He decided to salvage the porch rails that weren't rotting and thought of me to gift them too.  Holy cow, what a win fall.


Here is what I have made so far:

After pre-cutting the tops to stagger the heights of each stair rail, I drilled pilot holes in the bottoms and inserted Dollar store dowel rods.  The dowels are to hold the rails up in the soil.  Each house is of course acrylic clear coated, so are the dowels and the bottom of the rails to protect from moisture.
The birdhouses are from the Dollar Store.  My paint job is a whimsical homage to beach huts.

$20 Console Table

Another Spindle project the hubby and I worked on together is a console table for our hallway.
Material's:
6 stair rails
2 - 6" x 2" lumber cut to 11" long each (we used left over wood from our car port tear down)
12" x 48" pine project panel ($16.99 Homedepot.ca)
1 - 2" x 2" piece of lumber cut to 2 - 40" pieces ($2.99 Homedepot.ca)
Kreg Jig
2.5" pocket hole screws
Gorilla Glue
wood filler
paint and or stain
Assembly:
We removed 4" off each spindle so our assembled console height is 30".
Glue and screw in from the bottom each center spindle in the middle of each 11" 6 x 2.
Glue and screw each additional spindle in place.
Add the 40" skirting piece to the top of the spindle.  
We used the Kreg Jig to make pocket holes to attach these pieces.
Placing the table top surface on the floor, we marked out where the frame would be attached on the under side than flipped the project back over and drilled from the table top side down.

I have more projects planned, stay tuned.

Other Ideas Available on the Web:

Here are some of the cool upcycled possibilities using stair rails found on the web.  Any rails would work for most of these project, many are done using spindles from chairs or head boards. I think I want to do all of them.
Our Southern Home - beverage station (I so want to do this project)
Pinterest - Snowmen (I cannot find the originator of this image, only Pinterest links)
Follow Your Heart Woodworking - North Pole Decoration
Something Wonderful - Teacup bird feeders
My Re-purposed Life - Candle holders
HGTV - Coat Rack
My Love 2 Create - porch planter
DIY Show Off - Wooden Welcome Post
Lucy Desings - Dragon Flies & Butterflies
Pinterest - More ideas that have been pinned