Showing posts with label wood blocks. Show all posts

Sunday, 2 September 2018

Bathroom Signage

So it's been a while.  I think the house renovations, starting with Boo's room and closet have eaten up all my crafting mojo.  As well, my crafting room is now housing my 1 million and 1 IKEA kitchen boxes.  I can't even so much as open a cupboard in there.
I had a friend who recently repainted her kids bathroom and requested a sign.  I had planned differently lettering, but since my craft room is clogged up, I could 't get to the old machine that I use Sure Cuts A Lot on, so I had to resort to using a Cricut cartridge.

I wanted to add Enter at own Risk along the bottom, but my friend didn't want that.
This pre-made distressed wood sign was $7.00 at Michael's using a 50% coupon.  So quick when you don't have to assemble anything or distress it yourself.
I cut out the vinyl template using my Don Juan cartridge.  I read a tip online eons ago that to help the lettering remain crisp when painting, to Modge Podge over the template first.  I can say 100% DO THIS.  It really works.
So here is the IKEA mock up of our kitchen.  We have moved appliances around so we can have more counter space.
The stove was on the other wall, by moving it that whole space can now be counter top.
And here is our mock up for the basement bathroom.  We aren't doing it through IKEA, but I used the free online IKEA planning program to play around with it.
We went back and fourth about tiling a bathroom stall vs a prefab stall.  Since we have seriously hard water and it's meant to be the kids bathroom, we have decided to do a prefab that looks like it's tiled.  We aren't settled on the exact one, but I did see one at Lowes that is faux Carrara tile.

Thursday, 1 February 2018

Cool LIght

I found a cool metal light shade for the Boys new room, but had to come up with a cheaper solution.  Design inspiration below.
I found similar direction from Vintagerevivals
I glued pieces of 1x1 spare lumber to make a 11.5" cube.
The hubby helped me staple the end together while the glue dried.  We didn't have clamps that were long enough.  Once the glue was dried, I filled the holes and imperfections, sanded then painted it with black acrylic paint.
 
We had the IKEA pendant light left over from when this was Boo's room.  We have since switched out the boring lightbulb for a cool retro Edison style light bulb: see above with the installed shade images

Other than the light bulb, this project was free.  I used all spare lumber and we already had the pendant.

Sunday, 20 September 2015

Fall Decorating

See further down for DIY crafting:

It's that time of year again.  In Canada, Halloween and Thanksgiving are in the same month, so Fall/Thanksgiving decorations are only put up for a very short period of time.  I seem to focus more on Halloween, but decided I needed a Fall crafting blitz.


Here is my Fall fireplace mantel.  Yes, it's a fake fireplace, we didn't inherit a real one with the purchase of this house *sigh*.

Here are the close-ups of the mantel (from left to right:


Dollar store pumpkins/gourds in the Hurricane lamp and the metal bird cage.


 Dollar store foliage garland and Michael's 60% fake mums (5 bunches @ $1.11 ea.) 


This cool rattan or corded raffia pumpkin was a new purchase from HomeSense (similar to the U.S. HomeGoods).  I have been waiting 8 years for a HomeSense to FINALLY open in my town.  It's been 3 weeks and I have been there more then a dozen times.

Now for the DIY bits:

A while back, my mother-in-law purchased two standing plaques at a discount store for me to re-craft. I Mod Podge'd burlap over the base of one and then added cardstock letters which were in the Dollar bin at Michael's.  The Leaf charms are from my card making stash. 


This dollar store pumpkin was covered in pages from an old Dictionary that is used just these kind of crafts.  (I think it was hubby's dictionary in High School - ya, that's definitely not up to date, can you imagine the World Map section *laugh*


I tore the dictionary paper into strips and adhered it to the dollar store plastic pumpkin with Mod Podge.  I tucked the top of the paper under the removable plastic pumpkin stem.


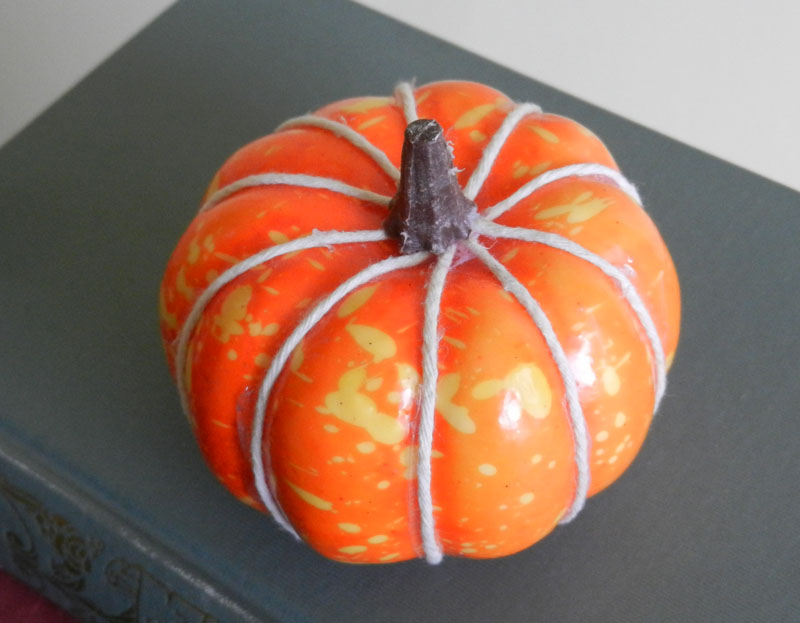
This pumpkin was from the Dollar Store gourd package.  


I tucked the start of the twine under the plastic removable stem and then wrapped the twine along the seems of the pumpkin.  


Tucking and hot gluing the end again under the stem.


I used some left over letters from the above "Fall" signage and glued them to a cork covered piece of 1 x 6 (cut down to 1 x 3) from my wood stash.


Some more Fall decorating:
For more on the pallet pumpkin see the post here.


Monday, 24 August 2015

Blocks Again

Wow these blocks are so fast to do when you use vinyl lettering.  


A friend wanted decor blocks in her last name.  I used scrap wood, but not 2 x 4's as done previously, but 2 x 3's. They end up being 2.5" squared blocks. I've made these using 2 x 4's see this post for details, but wanted to make the blocks slightly smaller since the last name is a bit long.


I trimmed the Stampendous stamp to fit, antiqued the edges using "Old Paper and "Chocolate" paper stain and then added vinyl lettering.

If you don't have vinyl lettering, you can make these using cardboard letters or any letter stencil see full details here.  

My painted blocks still need to be sanded down, but and a protective coat, but basically are done.

Monday, 10 August 2015

2 x 4 Word Blocks

Savory Stamping Original Post: October 2010 - BOO To You 

This was a super easy project. I cut the blocks from 2 x 4's. I painted them black with regular acrylic craft paint.  Then sanded down the edges for the shabby chic effect. On white card stock I stamped the background with a Stampendous block stamp in black ink, traced dollar store chipboard letters onto each block then filled in with marker.  (update, I have since started using cut vinyl letters using my Cricut.  You can use the letters straight on and add a protective polyurethane coat or use the negative of the vinyl and fill in the letters with paint.)


Here are some other projects done via the same method:
  

These blocks were paint speckled. I distressed scrapbook paper and painted the outlined letters.