Showing posts with label WOOD PALLET SIGNAGE. Show all posts

Sunday, 2 September 2018

Bathroom Signage

So it's been a while.  I think the house renovations, starting with Boo's room and closet have eaten up all my crafting mojo.  As well, my crafting room is now housing my 1 million and 1 IKEA kitchen boxes.  I can't even so much as open a cupboard in there.
I had a friend who recently repainted her kids bathroom and requested a sign.  I had planned differently lettering, but since my craft room is clogged up, I could 't get to the old machine that I use Sure Cuts A Lot on, so I had to resort to using a Cricut cartridge.

I wanted to add Enter at own Risk along the bottom, but my friend didn't want that.
This pre-made distressed wood sign was $7.00 at Michael's using a 50% coupon.  So quick when you don't have to assemble anything or distress it yourself.
I cut out the vinyl template using my Don Juan cartridge.  I read a tip online eons ago that to help the lettering remain crisp when painting, to Modge Podge over the template first.  I can say 100% DO THIS.  It really works.
So here is the IKEA mock up of our kitchen.  We have moved appliances around so we can have more counter space.
The stove was on the other wall, by moving it that whole space can now be counter top.
And here is our mock up for the basement bathroom.  We aren't doing it through IKEA, but I used the free online IKEA planning program to play around with it.
We went back and fourth about tiling a bathroom stall vs a prefab stall.  Since we have seriously hard water and it's meant to be the kids bathroom, we have decided to do a prefab that looks like it's tiled.  We aren't settled on the exact one, but I did see one at Lowes that is faux Carrara tile.

Saturday, 3 September 2016

Free Whales & Waves Printables

FREE PRINTABLE Whales and Waves Wall Art

Olivia picked out her baby bedding from Target - Circo Whales and Waves, which I purchased from Amazon.ca.  The whales read as yellow in the Target photo, but they are actually light lime green.  
I Photoshoped some printables to match the Whales and Waves bedding ensemble. 

Designed for 8x10 frames - Click on the link to download free printable's


The images are free clipart found online.  

Free Digital Paper:


Sunday, 8 May 2016

Happy Mothers Day

Thrift Store Teacup Succulents - see below for instructions. 

Click on image to read the full post.
To all my family and friends, I hope you had a fantastic Mother's Day.
My hubby and kids were extra wonderful to me.  Hannah took a "re-purposed" workshop with "From the Attic Interiors".  She painted me a wonderful wooden candle holder and gorgeous stencil sign.  Anderson painted a beautiful scene on a seashell and they both with the help of daddy bought me a food processor.  Hurray, black bean brownies for everyone!

As an added treat the hubby splurged and bought me cushions for our outdoor furniture sectional we built using wood from our the carport tear down. The sun hasn't cooperated today to take a photo of the furniture.  I will post them in the near future.

Here is my Mother's Day gift for the mom's in my life.  Some of you won't have them in hand until the next time I see you.  I can't wait to find more cups.

Teacup Succulents Recipe.
Difficulty Level: Easy, no husband required
  • Adhesive (E6000 craft adhesive or Silicone adhesive sealant) I didn't use any adhesive, the cup and saucer are not attached.
The masking tape helps the drill bit not slip while the hole is starting. 
For outdoor teacups, drill a hole through the cup and the saucer for drainage.  You can glue the saucer and cup together with clear silicon adhesive sealant or E6000 craft adhesive before drilling.  I opted not to glue them together.  For indoor cups, a hole in the teacup alone should be sufficient.  Succulents prefer to be dry.

Place a few small rocks at the bottom of the cup to promote drainage.  Add succulent and top with Cactus potting mix.

Here's my kids art projects for me.


Sunday, 20 March 2016

Boo Decor


Michael's Craft store has burlap covered canvases on sale this past weekend.  Using my b-day gift card (thanks Hubby and kids), I bought one for Boo's room.  Using SCAL, I mocked up an inspirational quoted and then painted it onto the canvas using the vinyl as template.
I did brush the lettering with ModPodge and let it dry before painting the stencil letters.  It did help my letter turn out crisper with less bleeding.  It was perfect though.  I had to mix some canvas coloured paint for some minor touch-ups.  All and all though I would recommend using Modge Podge first.

Michael's also had news print covered canvases out.  I didn't buy any, but it did inspire the cat silhouette.  I bought the wood hanging boards/frames from the Dollarstore.  I thought the bird chipboards would be easy to pull off - NOPE.  So I removed the hanging screws to reverse the board to use the backsides.


 The bird die cut was from an XMas gift card I received and put aside.


Sunday, 18 October 2015

Halloween - Haunted Signage

Using the second of the two sign plaques that my Mother In Law gave me, I painted and sanded it to shabby chic perfection.  I used Halloween rub-on's that are so old, I can't even remember WHEN I bought them on spider web paper scraps from my stash.  I paper stained the edges with Tim Holtz "Old Paper".


The balsam wood "Haunted" is from Michael's, I cut off the House portion from the bottom, painted it black and covered in black Stickles.  

Check out the The "Canicula Embalming Fluid" bottle.  It's REAL.  I know I have shown this bottle before on my previous blog, but it's just so cool.


CANICULA
CONCENTRATED
EMBALMING FLUID

100% PURE CHEMICALS

PERFECT COSMETIC EFFECT
COMBINED WITH UNSURPASSED
PRESERVATIVE, ANTISEPTIC
AND
DEODORIZING  QUALITIES

DIRECTIONS

For ordinary cases use 4 oz to 6 oz
to the half-gallon for first injection.
Use 6 oz to 8 oz to the half-gallon
for second injection.

For extreme cases - after first
injection - use full strength (16 oz to
the half-gallon).  For cavity injection
use concentrated form.

Price $5.00

CANICULA
CHEMICALS CO.
TORONTO, CANADA

Sunday, 20 September 2015

Fall Decorating

See further down for DIY crafting:

It's that time of year again.  In Canada, Halloween and Thanksgiving are in the same month, so Fall/Thanksgiving decorations are only put up for a very short period of time.  I seem to focus more on Halloween, but decided I needed a Fall crafting blitz.


Here is my Fall fireplace mantel.  Yes, it's a fake fireplace, we didn't inherit a real one with the purchase of this house *sigh*.

Here are the close-ups of the mantel (from left to right:


Dollar store pumpkins/gourds in the Hurricane lamp and the metal bird cage.


 Dollar store foliage garland and Michael's 60% fake mums (5 bunches @ $1.11 ea.) 


This cool rattan or corded raffia pumpkin was a new purchase from HomeSense (similar to the U.S. HomeGoods).  I have been waiting 8 years for a HomeSense to FINALLY open in my town.  It's been 3 weeks and I have been there more then a dozen times.

Now for the DIY bits:

A while back, my mother-in-law purchased two standing plaques at a discount store for me to re-craft. I Mod Podge'd burlap over the base of one and then added cardstock letters which were in the Dollar bin at Michael's.  The Leaf charms are from my card making stash. 


This dollar store pumpkin was covered in pages from an old Dictionary that is used just these kind of crafts.  (I think it was hubby's dictionary in High School - ya, that's definitely not up to date, can you imagine the World Map section *laugh*


I tore the dictionary paper into strips and adhered it to the dollar store plastic pumpkin with Mod Podge.  I tucked the top of the paper under the removable plastic pumpkin stem.


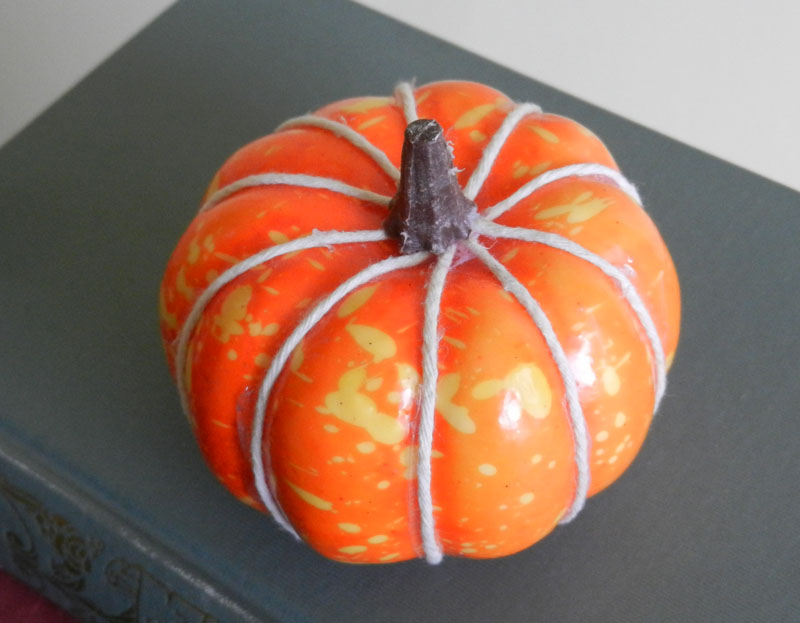
This pumpkin was from the Dollar Store gourd package.  


I tucked the start of the twine under the plastic removable stem and then wrapped the twine along the seems of the pumpkin.  


Tucking and hot gluing the end again under the stem.


I used some left over letters from the above "Fall" signage and glued them to a cork covered piece of 1 x 6 (cut down to 1 x 3) from my wood stash.


Some more Fall decorating:
For more on the pallet pumpkin see the post here.


Friday, 21 August 2015

Do you "Case"?

Here's my moral dilemma when it comes to casing:  I LOVE other peoples projects immensely, but can't help feeling "oh, I want to to do that too".  So I often "case" them.  Is this wrong, especially if the item is something you've seen for sale on "Etsy"?


This is my first attempt with vinyl, as you can see, my second sentence is not straight, oops. Not as noticeable IRL, huh! 

Someone else put the time and energy into the project and came up with the idea, so is it wrong to borrow their idea?

They do say imitation is the sincerest form of flattery, let's hope the "Etsy" artist I cased thinks so too.  Honestly, it wouldn't be something I would purchase on line any way, the shipping cost would be enormous.  Even if I were to see this in a store, I would think "I can make that, myself" and wouldn't purchase it.  Plus making it burns some of that anxious crafting energy.

I have to admit, I case all the time when card making, especially when I am in a pinch and I need something quickly.