Showing posts with label TUTORIALS. Show all posts

Sunday, 25 September 2016

IKEA - KRUSNING Hanging Paper Lampshade

How to Dye an KRUSNING Paper Lampshade

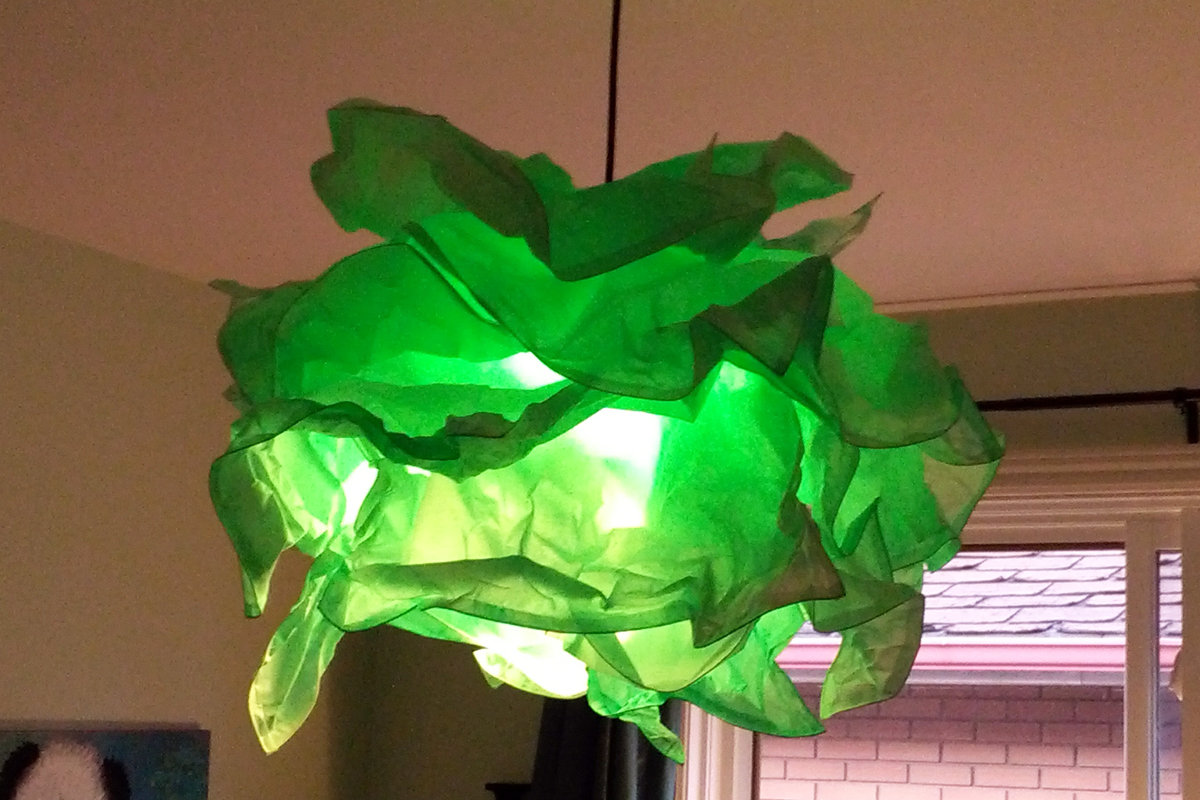
Boo picked out a $20 Krusning hanging paper lampshade from IKEA for her room.  It only comes in a slightly off white colour.  We decided to try dying it to match her decor.
We started by disassembling the lampshade by removing the plastic circular centre ring.  A screw driver was required to pop it apart.
In a large spray bottle I mixed food colouring, acrylic paint and water until I had the right colour for the finished shade.  Hanging the individual paper sheets from a laundry line in our basement, I saturated each side of the seven paper sheets and let them air dry.  Be prepared, it does leave a mess on your basement floor.
Once dry,  we reassemble the sheets and snapped the ring back in place.  Following the assembly directions that came with the lampshade and we now a beautiful have a cute colour matched lampshade.
Sean says it make the bedroom feel like an underwater Grotto at night.

Friday, 19 August 2016

Painted Panda Canvas

Mom and Daughter Art Project

Boo and I were inspired by some canvas art for sale at our local Homesense (similar to Homegoods in the US).
Boo's favourite animals are Giant Panda, so we had to use our local Zoo's panda cubs. We used an image of 9 month old Jia PanPan and Jia YueYue.  Their names translate to Canadian Hope and Canadian Joy.

Here is our tutorial:

In Photoshop I removed the background from the origianl Panda cub image.  The image is from an online media website.

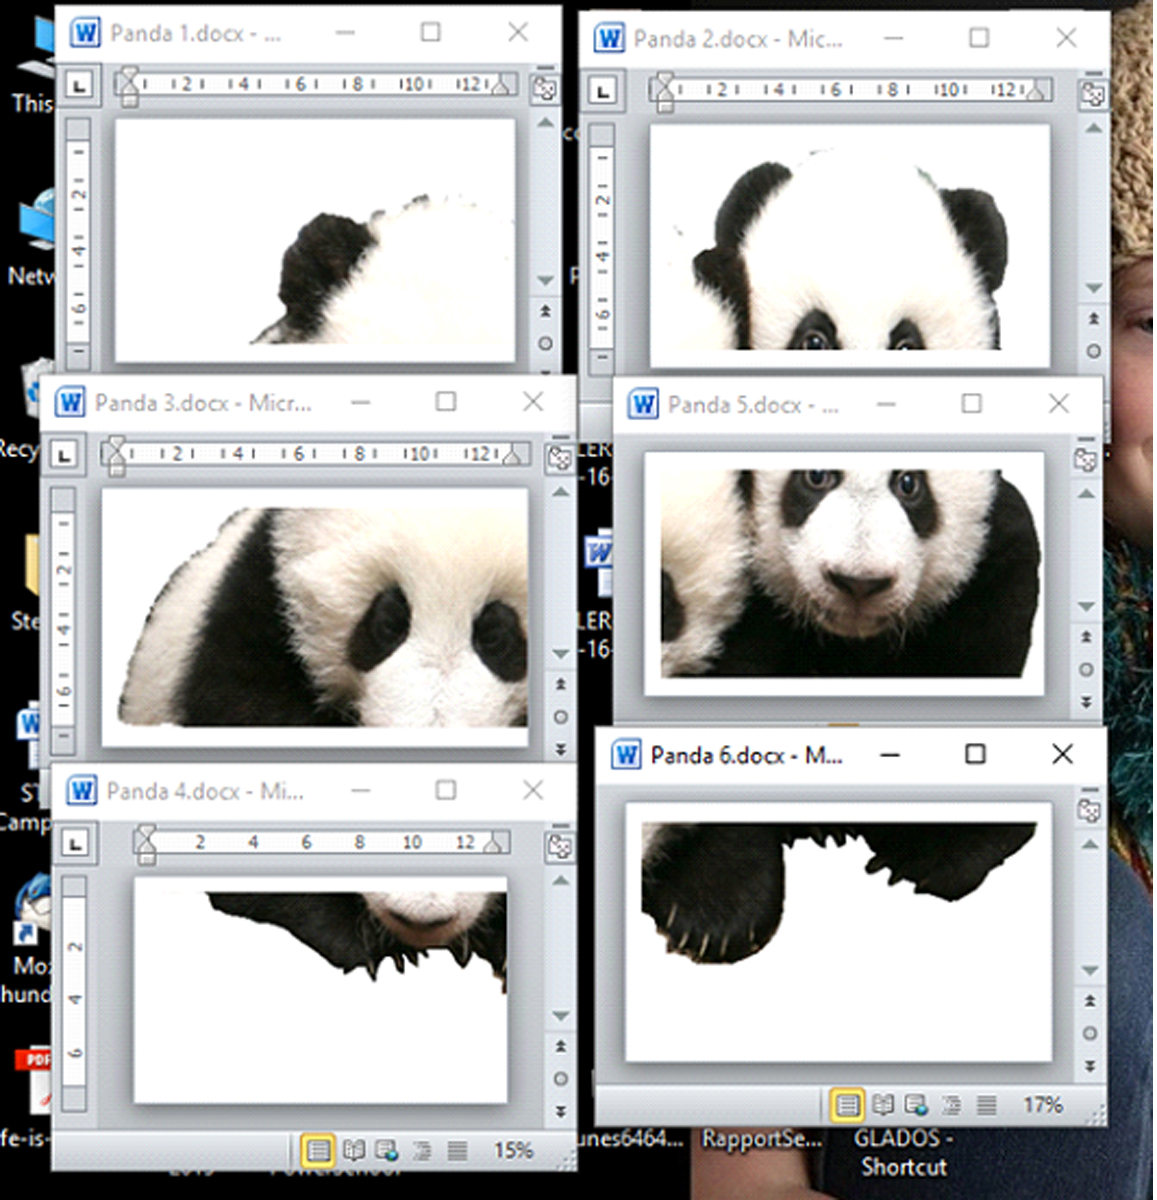
Below is our first printed attempt.  The image wasn't large enough on 3 sheets so I cropped them into 6 sheets of legal size paper instead. 
Printing Instructions:
I inserted the image into MS Word choosing "legal" paper size in the Page Layout tab and landscape orientation. I re-sized and cropped the image allowing for some image overlap and saved it into 6 files.  Then printed each segment onto legal paper on a black and white laser printer.
Using scissors we trimmed the printed panda sheets, matched up the segments then taped it together on the back side using minimal amounts of masking tape.  

3 sheets of patterned scrapbook paper fit perfectly across the canvas allowing for a bit of overlap.  

To prevent the scrapbook paper colour accidnetly bleeding through the panda image once glued, we traced then cut out the panda outline on the scrapbook paper before gluing it onto the canvas.  We used Mod Podge adhesive (Tip: less paper curling happens if the Mod Podge is added to the canvas not the paper - once dry the bubbles will recess.)
We did not add Mod Podge overtop of the glued and dried Panda image as per the Mod Podge instructions.  Instead we painted a layer of Liquitex Clear Gesso to seal and add structural integrity to the laser printed paper.  

We also added some additional scrapbook remnants to make the cubs look as if they are leaning over the painted Magnta banner.
Start painting in layers working from the outside of the body inward.  The paint stroke direction is the opposite, from the body outward. 

Feather Stroke: lighten up on the brush pressure in an outward motion, the paint stroke will strart thicker and 

Let each layer dry before moving on the next layer or colour in the gradiation. Overlap each layer slightly using a feathering stroke (lighten up on the brush pressure in an outward motion).
Panda Close Up
The bamboo image is from The Craft Chop - tree frame that I cropped in Sure Cuts A Lot.

Sunday, 8 May 2016

Happy Mothers Day

Thrift Store Teacup Succulents - see below for instructions. 

Click on image to read the full post.
To all my family and friends, I hope you had a fantastic Mother's Day.
My hubby and kids were extra wonderful to me.  Hannah took a "re-purposed" workshop with "From the Attic Interiors".  She painted me a wonderful wooden candle holder and gorgeous stencil sign.  Anderson painted a beautiful scene on a seashell and they both with the help of daddy bought me a food processor.  Hurray, black bean brownies for everyone!

As an added treat the hubby splurged and bought me cushions for our outdoor furniture sectional we built using wood from our the carport tear down. The sun hasn't cooperated today to take a photo of the furniture.  I will post them in the near future.

Here is my Mother's Day gift for the mom's in my life.  Some of you won't have them in hand until the next time I see you.  I can't wait to find more cups.

Teacup Succulents Recipe.
Difficulty Level: Easy, no husband required
  • Adhesive (E6000 craft adhesive or Silicone adhesive sealant) I didn't use any adhesive, the cup and saucer are not attached.
The masking tape helps the drill bit not slip while the hole is starting. 
For outdoor teacups, drill a hole through the cup and the saucer for drainage.  You can glue the saucer and cup together with clear silicon adhesive sealant or E6000 craft adhesive before drilling.  I opted not to glue them together.  For indoor cups, a hole in the teacup alone should be sufficient.  Succulents prefer to be dry.

Place a few small rocks at the bottom of the cup to promote drainage.  Add succulent and top with Cactus potting mix.

Here's my kids art projects for me.


Thursday, 24 December 2015

Getting Organized

While perusing the Internet for some DIY Kitchen organizing tips, I came across this post from Kevin & Amanda.com, on how to make your own wood drawer dividers.  

I've been looking at different dividers and bins from various Kitchen supply stores and the prices were just going to be too much.  I couldn't wait to try out this project after finding the post.  I bought 12 pieces of lumber.  At just over $25 Canadian - what a bargain for completely custom fit organization.
I used 1/4 inch thick "hobby board" made of poplar from Home Depot.  They were just over $2.00 CAD a piece.  It took approximately 3 boards per drawer - I've only completed 2 so far, so that's a guesstimate.

Here is what you'll need (no husband required):
I covered the bottom of the drawer with parchment paper, or you can use newspaper, just to protect it from glue drips.
I laid out my utensils how I wanted, measured and cut the pieces to fit.  I glued the dividers together, but not to the drawer walls.  I want to be able to remove these later if necessary. Or to add drawer liner later on.
You could be really exact and make a a box frame around the inside of the drawer before adding the dividers, that would require extra wood - I am El Cheapo. 
I chose to add just the dividers.  I did have to add some end pieces to stabilize it so the
whole thing wouldn't slide or shift over time.

Tuesday, 15 December 2015

Keep Cheaping On

Make Your Own Decor Pillows


I am so surprised how these pillows turned out.  They look like faded denim.  This would be a perfect method if you were trying to achieve the “old coffee bag” effect using a vintage printable.

Again in my attempt to whip up some cheap inexpensive Christmas ornament, I found a recipe to make your own fabric paint.  Incredibly enough, I had ALL the ingredients already on hand, which almost never happens.

Keep reading for tutorial on this project.

Now you may ask, why buy Liquidex Medium when it’s just as much to purchase fabric paint?  I have Liquidex on hand for Art Journaling, but now I can make ANY COLOUR fabric paint.  I don’t have to purchase individual colours.  That’s a bonus.

Here’s what you need for these adorable pillows:

  • Painters drop cloth (from your local hardware store) – sewn into an envelope pillow case cover
  • Liquidex Medium (or any Acrylic Medium) - I used transparent, it doesn’t change the colour
  • Craft paint – colour of your choice
  • Pencil
  • Paintbrush
  • Printer & regular printer paper
  1. Sew pillow case covers from pre-washed painter’s drop cloth (hardware store purchase – paint aisle)
  2. Print the image on regular printer paper
  3. To increase the size of the image beyond the 8.5 x 11 paper, in Word I “cropped” the deer image into two: deer top half and deer bottom half, than overlapped them once printed.  The J-snowflake-Y were each printed on their own pages.*Subsequently you can use the "tile" function on one whole image so it is printed largely over several 8.5x11 sheets of paper
  4. Cut out the image and then lay flat on your fabric
  5. Outline or trace the image onto the pillow case cover in pencil
  6. Mix Liquidex Medium and craft paint.  I used half and half (red did look pink when adding medium, but dried accurately)
  7. Let dry

*To remove the pencil markings, I washed my pillow case covers after they dried.  This MAY be how I got the lightened denim effect. 

I wonder if I IRONED the paint after it dried to heat set it before washing, if it would fade less.
I’m going to try this on test piece just to see what happens.

Envelope pillow case cover tutorial found here @ Instructables.com:

DIY fabric paint tutorial here @ Instructables.com:

Deer silhouette found here @ 11 Magnolia Lane.com:

Sunday, 6 December 2015

I'm Dreaming of a CHEAP Christmas!

Let's Do Christmas on the Cheap, shall we.  

I decided I wanted to change up some of my Christmas decor, so I bagged up any "countrified" decorations and sent them away to a good home.  Since we are in the midst of some kitchen renovating, I can't quite justify replacing things THIS year.  Here's how I filled in some of the gaps of my decor, but on a dime.


Wrapping paper art:  I wrapped my large canvas art in Dollar Store paper and glitter ribbon.  I can't take credit for this project, I saw it online.  That person must have shopped at the Dollar Store too, I found the same paper there.


Rolled wrapping paper tree cones.  These can be seen all over the Internet.  You can cover styrofoam forms with fabric, or do it the CHEAP way like I did.  I made a cone out of cardboard then covered it in... you guessed it Dollar Store wrapping paper.  Here is a good cone tree making tutorial @ Sand & Sisal.com.


BTW, did you notice I flipped my pallet wood shelving?  It holds things better this way.  I added some drawer pulls that were saved from my daughter's old IKEA dresser that fell apart.  The dresser went in the trash, and the pulls have become part of the decor.  I REALLY prefer the look of the shelf this way.


I painted the pants of the Nutcracker seen here to make it fit the colour scheme better.  I have a few larger Nutcrackers (*insert joke here) that still need to be painted, and one that I am making a new felt cape for.  


I filled a shadow box frame I already had on hand with Dollar Store Christmas baubles, (snowflakes, jingle bells, and pom poms).  Glued some scapbook paper to the backing and cut out a slogan in vinyl. You can purchase pre-cut vinyl lettering at your local Staples store if you don't have a cutting machine.  A tutorial to make a holiday shadowbox frame can be found @ To Simple to Inspire.com.


I threw together some "scrap" scrapbooking paper and coordinating stickers to use with my "new" holiday clipboards.  I bought it on sale at Michael's for 60% off, OKAY, so I'm not perfect and bought something ;D


I have one other inexpensive project in the works, but with sanding and painting the kitchen cabinets this weekend, I ran out of time and steam.

Saturday, 17 October 2015

Dollar Store Feather Boa Wreath

$13.00 Halloween Wreath Tutorial

Everything for this project was purchased from the dollar, except the Styrofoam wreath form.  The form is $ 9.99 @ Michael's, but I used a 40% off coupon.


Wrap the entire wreath form with black Electrical tape or black duct tape if you have it.  I have seen similar wreaths online that were wrapped in black fabric ribbon before adding the feathers.  The electrical tape made this super quick and easy.  It adheres instantly and is very flexible.  Plus it was one less item I had to purchase since I already had it on hand.

The boa is fastened onto the form with metal sewing pins.

Awesome tip: only partially wrap the boa's onto the wreath, leaving a long feather tail. Using the electrical tape, adhere the unsightly section of the wired roses onto the wreath then cover with the reaming boa.

Cost Breakdown: 
1 - Hall Rose Bqt Glit $ 1.25
3 - Feather Boa's $ 1.00 ea.
1 - Black Glitr Crow $ 1.25
1 - Styrofoam Wreath $ 6.00 (with the 40% discount)
Total: $11.50 before taxes

Ignore the glue gun, I didn't end up using it at all in this project.


Thanks to curlymade.blogspot.ca for the super fun hand drawn arrow jpg's, and dafont.com for the Buffied font.

Sunday, 16 August 2015

Pallet Wood Shelf & Ledge Shelving

This project was made previously, but not shared until now.

Okay okay, so I know these shelves have been everywhere online, but I just had to have one.


This REALLY is the easiest pallet project.  You don't have to break down the pallet first woo hoo!  You simply cut off the section you want from the existing pallet, sand it down, paint it, stain it, or age it and away you go.  

You can go to Pallet Furniture DIY to see a version of this shelf turned upside with hooks on it.  Pretty cool


Pallet Wood Shelf tutorial found here by DIY Pallet Furniture.

Here's an art ledge shelf we made for Boo's room.  It's not made from reclaimed wood, but could be I suppose.  A few of the frames we removed the glass and added cork from the Dollar Store so the pictures can be easily swapped out.


I followed the direction for the ledge shelves found here at Ana-WhiteGAWD I love this site, I want to make everything here.  We've started an outdoor sectional project from here, but sadly it is not done yet.

Thursday, 13 August 2015

October 2010 Wtich Candy Stand REPOST

This witch candy stand was originally posted on my previous blog Savory Stamping October 2010. 

Funnily enough I have now 2015 seen stuffed fabric legs at my local craft store, who knew I was a trend setter. I have seen them used on wreaths and sticking up from outdoor pots.

I saw a Trick or Treat stand at a local Fall craft fair, two years in a row. Both times I mentioned to my hubby that I could make one myself, I finally got around to it.

This is a GREAT Dollar Store project. Believe it or not it only cost me approximately $5.00 to make this Trick or Treat goody bowl stand. The majority of the parts I already had in my craft stash.


Original post found here.


The only items I purchased for this project are all from the Dollar Store: the candy bowl, the "Come In... " sign, the cat, the broom and the green craft paint. The green tutu was from my daughters dress up bin, but was originally purchased from the dollar store. She gave me permission to re-purpose this for my project.


The stand was built with 2x4's and spare wood. I had orange canvas type fabric on hand that I painted for the the boots and legs, which I then sewed together, and painted with Acrylic craft paint. 


*I wouldn't recommend making little swirly toes on the boots as I did - once sewn it was almost impossible to right side out the fabric and stuff them


The stand or base was painted black and then I made my own green crackle paint using Dollar store craft glue.  Find the crackle paint directions here from Dollar Store Crafts.com


AGAIN - This witch candy stand was originally posted on my previous blog Savory Stamping October 2010.

Monday, 10 August 2015

2 x 4 Word Blocks

Savory Stamping Original Post: October 2010 - BOO To You 

This was a super easy project. I cut the blocks from 2 x 4's. I painted them black with regular acrylic craft paint.  Then sanded down the edges for the shabby chic effect. On white card stock I stamped the background with a Stampendous block stamp in black ink, traced dollar store chipboard letters onto each block then filled in with marker.  (update, I have since started using cut vinyl letters using my Cricut.  You can use the letters straight on and add a protective polyurethane coat or use the negative of the vinyl and fill in the letters with paint.)


Here are some other projects done via the same method:
  

These blocks were paint speckled. I distressed scrapbook paper and painted the outlined letters.