Showing posts with label PALLET WOOD. Show all posts

Sunday, 2 September 2018

Bathroom Signage

So it's been a while.  I think the house renovations, starting with Boo's room and closet have eaten up all my crafting mojo.  As well, my crafting room is now housing my 1 million and 1 IKEA kitchen boxes.  I can't even so much as open a cupboard in there.
I had a friend who recently repainted her kids bathroom and requested a sign.  I had planned differently lettering, but since my craft room is clogged up, I could 't get to the old machine that I use Sure Cuts A Lot on, so I had to resort to using a Cricut cartridge.

I wanted to add Enter at own Risk along the bottom, but my friend didn't want that.
This pre-made distressed wood sign was $7.00 at Michael's using a 50% coupon.  So quick when you don't have to assemble anything or distress it yourself.
I cut out the vinyl template using my Don Juan cartridge.  I read a tip online eons ago that to help the lettering remain crisp when painting, to Modge Podge over the template first.  I can say 100% DO THIS.  It really works.
So here is the IKEA mock up of our kitchen.  We have moved appliances around so we can have more counter space.
The stove was on the other wall, by moving it that whole space can now be counter top.
And here is our mock up for the basement bathroom.  We aren't doing it through IKEA, but I used the free online IKEA planning program to play around with it.
We went back and fourth about tiling a bathroom stall vs a prefab stall.  Since we have seriously hard water and it's meant to be the kids bathroom, we have decided to do a prefab that looks like it's tiled.  We aren't settled on the exact one, but I did see one at Lowes that is faux Carrara tile.

Monday, 23 May 2016

Succulent Window Frame

I used a chopped down section of pallet wood added a bottom with drilled holes for thorough drainage and added a variety of succulents.  I know that the succulents will eventually fill in, just not sure how quickly.  Thew window is the old basement bathroom window from our house that I saved from last fall when all our windows were replaced.  My hubby busted out the glass and I stapled Dollar Store chicken wire to the backside.
I stenciled "Le Jardin Heureux" the happy garden on the the front and voila, a cute lilttle window box that I hopefully can't kill.

Re-purposed Carport

Go Green.

The hubby took down our carport two summer's ago.  I had him save the 2 x 6 lumber so that we could re-purpose it into outdoor furniture.  We modified directions found on anawhite.com for platform furniture, but used 4 x 4 to raise the bench off the ground.
We even used old leftover paint from our shed to paint it.  Feels great to makes such a green project.
The cushions are from IKEA.  I haven't purchased throw pillows yet, but am thinking bright colours.  Our neighbor gave us the striped pillows and outdoor carpet.
We are in the process of making a few modular pieces to have a sectional.  I'll post photos when we are done.
I made the end tables from scarp wood we had from other projects and plan to make a few more. 

The kids enjoyed an outdoor movie with a friend while the folks hung out by the fire pit.  What a lovely way to spend the long weekend. 
Kewl tidbit about the umbrella.  We bought 2 of them from a Liquidation store for $25.00 each.  What a steal.

Sunday, 6 December 2015

I'm Dreaming of a CHEAP Christmas!

Let's Do Christmas on the Cheap, shall we.  

I decided I wanted to change up some of my Christmas decor, so I bagged up any "countrified" decorations and sent them away to a good home.  Since we are in the midst of some kitchen renovating, I can't quite justify replacing things THIS year.  Here's how I filled in some of the gaps of my decor, but on a dime.


Wrapping paper art:  I wrapped my large canvas art in Dollar Store paper and glitter ribbon.  I can't take credit for this project, I saw it online.  That person must have shopped at the Dollar Store too, I found the same paper there.


Rolled wrapping paper tree cones.  These can be seen all over the Internet.  You can cover styrofoam forms with fabric, or do it the CHEAP way like I did.  I made a cone out of cardboard then covered it in... you guessed it Dollar Store wrapping paper.  Here is a good cone tree making tutorial @ Sand & Sisal.com.


BTW, did you notice I flipped my pallet wood shelving?  It holds things better this way.  I added some drawer pulls that were saved from my daughter's old IKEA dresser that fell apart.  The dresser went in the trash, and the pulls have become part of the decor.  I REALLY prefer the look of the shelf this way.


I painted the pants of the Nutcracker seen here to make it fit the colour scheme better.  I have a few larger Nutcrackers (*insert joke here) that still need to be painted, and one that I am making a new felt cape for.  


I filled a shadow box frame I already had on hand with Dollar Store Christmas baubles, (snowflakes, jingle bells, and pom poms).  Glued some scapbook paper to the backing and cut out a slogan in vinyl. You can purchase pre-cut vinyl lettering at your local Staples store if you don't have a cutting machine.  A tutorial to make a holiday shadowbox frame can be found @ To Simple to Inspire.com.


I threw together some "scrap" scrapbooking paper and coordinating stickers to use with my "new" holiday clipboards.  I bought it on sale at Michael's for 60% off, OKAY, so I'm not perfect and bought something ;D


I have one other inexpensive project in the works, but with sanding and painting the kitchen cabinets this weekend, I ran out of time and steam.

Sunday, 20 September 2015

Fall Decorating

See further down for DIY crafting:

It's that time of year again.  In Canada, Halloween and Thanksgiving are in the same month, so Fall/Thanksgiving decorations are only put up for a very short period of time.  I seem to focus more on Halloween, but decided I needed a Fall crafting blitz.


Here is my Fall fireplace mantel.  Yes, it's a fake fireplace, we didn't inherit a real one with the purchase of this house *sigh*.

Here are the close-ups of the mantel (from left to right:


Dollar store pumpkins/gourds in the Hurricane lamp and the metal bird cage.


 Dollar store foliage garland and Michael's 60% fake mums (5 bunches @ $1.11 ea.) 


This cool rattan or corded raffia pumpkin was a new purchase from HomeSense (similar to the U.S. HomeGoods).  I have been waiting 8 years for a HomeSense to FINALLY open in my town.  It's been 3 weeks and I have been there more then a dozen times.

Now for the DIY bits:

A while back, my mother-in-law purchased two standing plaques at a discount store for me to re-craft. I Mod Podge'd burlap over the base of one and then added cardstock letters which were in the Dollar bin at Michael's.  The Leaf charms are from my card making stash. 


This dollar store pumpkin was covered in pages from an old Dictionary that is used just these kind of crafts.  (I think it was hubby's dictionary in High School - ya, that's definitely not up to date, can you imagine the World Map section *laugh*


I tore the dictionary paper into strips and adhered it to the dollar store plastic pumpkin with Mod Podge.  I tucked the top of the paper under the removable plastic pumpkin stem.


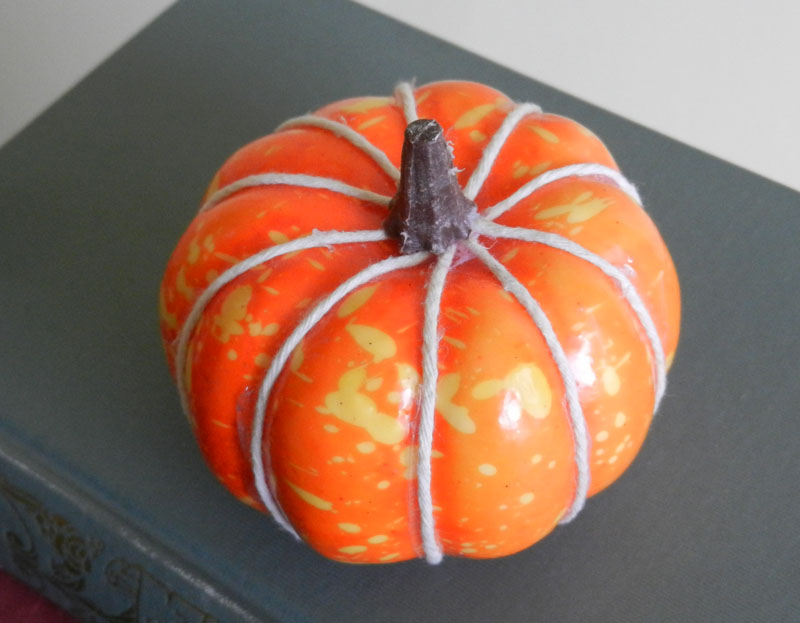
This pumpkin was from the Dollar Store gourd package.  


I tucked the start of the twine under the plastic removable stem and then wrapped the twine along the seems of the pumpkin.  


Tucking and hot gluing the end again under the stem.


I used some left over letters from the above "Fall" signage and glued them to a cork covered piece of 1 x 6 (cut down to 1 x 3) from my wood stash.


Some more Fall decorating:
For more on the pallet pumpkin see the post here.


Friday, 21 August 2015

Do you "Case"?

Here's my moral dilemma when it comes to casing:  I LOVE other peoples projects immensely, but can't help feeling "oh, I want to to do that too".  So I often "case" them.  Is this wrong, especially if the item is something you've seen for sale on "Etsy"?


This is my first attempt with vinyl, as you can see, my second sentence is not straight, oops. Not as noticeable IRL, huh! 

Someone else put the time and energy into the project and came up with the idea, so is it wrong to borrow their idea?

They do say imitation is the sincerest form of flattery, let's hope the "Etsy" artist I cased thinks so too.  Honestly, it wouldn't be something I would purchase on line any way, the shipping cost would be enormous.  Even if I were to see this in a store, I would think "I can make that, myself" and wouldn't purchase it.  Plus making it burns some of that anxious crafting energy.

I have to admit, I case all the time when card making, especially when I am in a pinch and I need something quickly.

Sunday, 16 August 2015

Pallet Wood Shelf & Ledge Shelving

This project was made previously, but not shared until now.

Okay okay, so I know these shelves have been everywhere online, but I just had to have one.


This REALLY is the easiest pallet project.  You don't have to break down the pallet first woo hoo!  You simply cut off the section you want from the existing pallet, sand it down, paint it, stain it, or age it and away you go.  

You can go to Pallet Furniture DIY to see a version of this shelf turned upside with hooks on it.  Pretty cool


Pallet Wood Shelf tutorial found here by DIY Pallet Furniture.

Here's an art ledge shelf we made for Boo's room.  It's not made from reclaimed wood, but could be I suppose.  A few of the frames we removed the glass and added cork from the Dollar Store so the pictures can be easily swapped out.


I followed the direction for the ledge shelves found here at Ana-WhiteGAWD I love this site, I want to make everything here.  We've started an outdoor sectional project from here, but sadly it is not done yet.

Friday, 14 August 2015

Pallet Wood Pumpkins and Signage

Sorry, more pallet wood projects coming up.

I made these fun fall pumpkins - Summer 2013, but never shared them online.

I glued and nailed together strips of pallet the used a hand held jigsaw to cut a rough pumping shape.  Sand, paint, nail to a base and away you go. 


I cut the pumpkin stems from separate wood and glued onto my pumpkins, but have since seen online where they are part of the same pallet formed with the jigsaw.  If I make more of these I would follow that method, my stems keep breaking off.


I need to redo the bases with heavier wood too so they can with stand the wind in the fall.

And paint splatter in brown green cream and white, really made the pumpkin skin texture pop.

Adding spiders and faux spider webbing makes these guys last into Halloween too.
 

Tuesday, 11 August 2015

Pallet Vinagar Jar Flower Holder

This is a project from last summer ~ 2014 ~

While perusing Pinterest I came across a cool flower holder using Pallet Wood.  I was on a bit of a DIY Pallet wood manic phase.

Any way, the Pinterest item was similar in style to the one I have made, but had 3 mason jars in the wooden holder.


I age my wood using the vinegar and rusted metal technique found here.


 I thought vinegar jars would be perfect, I wanted a holder for singular flowers like daisies, although hydrangea's look amazing in them too.  The burlap and "bloom" I came up with on my own.  Truth be told, I was desperate to try an acetone transfer technique and came up with a project just to give it a try.  I filled in my letters with a marker.  Unlike the video, I used an old plastic gift card to rub the image, not a knife.


 Here is a video by madebymarzipan that demonstrates the acetone transfer technique.  Remember font needs to be printed in reverse.

FYI - you can tranfer black and white photos with this method too.

Of course you could use vinyl lettering here.  At the time of this project, I didn't have any vinyl.