For some time now, my daughter and I have been thinking of making Abstract art on canvas. We had some smaller canvases donated by Nana, but were waiting for large ones to go on sale at Michael's.
Here's Boo's project. We first watched some Youtube videos about Fluid Liquid acrylic painting. (example: here.)
Hannah sprayed the paints with a water bottle while they were still wet to create this effect. She used regular craft acrylic paint.
The photos don't do it justice. When you turn it over it resembles a birch forest in front of a lake.
The squares were done with Medium Gesso and a repeating square stencil that was left to dry for 24 hours before adding paint.
Crafts, DIY, art projects and more... formally Savory Stamping http://savorystamping.blogspot.ca/
Tuesday, 3 November 2015
Sunday, 18 October 2015
Halloween - Haunted Signage
Using the second of the two sign plaques that my Mother In Law gave me, I painted and sanded it to shabby chic perfection. I used Halloween rub-on's that are so old, I can't even remember WHEN I bought them on spider web paper scraps from my stash. I paper stained the edges with Tim Holtz "Old Paper".
The balsam wood "Haunted" is from Michael's, I cut off the House portion from the bottom, painted it black and covered in black Stickles.
Check out the The "Canicula Embalming Fluid" bottle. It's REAL. I know I have shown this bottle before on my previous blog, but it's just so cool.
The balsam wood "Haunted" is from Michael's, I cut off the House portion from the bottom, painted it black and covered in black Stickles.
Check out the The "Canicula Embalming Fluid" bottle. It's REAL. I know I have shown this bottle before on my previous blog, but it's just so cool.
CANICULA
CONCENTRATED
EMBALMING FLUID
100% PURE CHEMICALS
PERFECT COSMETIC EFFECT
COMBINED WITH UNSURPASSED
PRESERVATIVE, ANTISEPTIC
AND
DEODORIZING QUALITIES
DIRECTIONS
For ordinary cases use 4 oz to 6 oz
to the half-gallon for first injection.
Use 6 oz to 8 oz to the half-gallon
for second injection.
For extreme cases - after first
injection - use full strength (16 oz to
the half-gallon). For cavity injection
use concentrated form.
Price $5.00
CANICULA
CHEMICALS CO.
TORONTO, CANADA
Saturday, 17 October 2015
Dollar Store Feather Boa Wreath
$13.00 Halloween Wreath Tutorial
Everything for this project was purchased from the dollar, except the Styrofoam wreath form. The form is $ 9.99 @ Michael's, but I used a 40% off coupon.Wrap the entire wreath form with black Electrical tape or black duct tape if you have it. I have seen similar wreaths online that were wrapped in black fabric ribbon before adding the feathers. The electrical tape made this super quick and easy. It adheres instantly and is very flexible. Plus it was one less item I had to purchase since I already had it on hand.
The boa is fastened onto the form with metal sewing pins.
Awesome tip: only partially wrap the boa's onto the wreath, leaving a long feather tail. Using the electrical tape, adhere the unsightly section of the wired roses onto the wreath then cover with the reaming boa.
Cost Breakdown:
1 - Hall Rose Bqt Glit $ 1.25
3 - Feather Boa's $ 1.00 ea.
1 - Black Glitr Crow $ 1.25
1 - Styrofoam Wreath $ 6.00 (with the 40% discount)
Total: $11.50 before taxes
Ignore the glue gun, I didn't end up using it at all in this project.
Thanks to curlymade.blogspot.ca for the super fun hand drawn arrow jpg's, and dafont.com for the Buffied font.
Monday, 12 October 2015
Halloween Deco Mesh Wreath
I finally tried making a Deco Mesh wreath. I can't believe how easy it was. Hint, buy the right colour pipe-cleaners. I just used what was on hand.
Deco Mesh YouTube tutorial found here.
Very happy with the results, I may change up some of the elements at another time, but for now I am satisfied. I have so much mesh left over it's ridiculous. Anyone want a Halloween Decor Wreath?
Sunday, 4 October 2015
Burlap Pumpkins
Here's a few pumpkin crafts I worked up this weekend.
Paint or distress the Styrofoam pumpkin, Mod Podge the burlap strips in place and hot glue ribbon onto the seams.
I also took the paper Decoupage pumpkin I made in a previous post and added ribbon and wrapped twine around the stem.
Sunday, 20 September 2015
Fall Decorating
See further down for DIY crafting:
It's that time of year again. In Canada, Halloween and Thanksgiving are in the same month, so Fall/Thanksgiving decorations are only put up for a very short period of time. I seem to focus more on Halloween, but decided I needed a Fall crafting blitz.
Here is my Fall fireplace mantel. Yes, it's a fake fireplace, we didn't inherit a real one with the purchase of this house *sigh*.
Here are the close-ups of the mantel (from left to right:
This cool rattan or corded raffia pumpkin was a new purchase from HomeSense (similar to the U.S. HomeGoods). I have been waiting 8 years for a HomeSense to FINALLY open in my town. It's been 3 weeks and I have been there more then a dozen times.
Now for the DIY bits:
A while back, my mother-in-law purchased two standing plaques at a discount store for me to re-craft. I Mod Podge'd burlap over the base of one and then added cardstock letters which were in the Dollar bin at Michael's. The Leaf charms are from my card making stash.
I tore the dictionary paper into strips and adhered it to the dollar store plastic pumpkin with Mod Podge. I tucked the top of the paper under the removable plastic pumpkin stem.
Tucking and hot gluing the end again under the stem.
I used some left over letters from the above "Fall" signage and glued them to a cork covered piece of 1 x 6 (cut down to 1 x 3) from my wood stash.
Some more Fall decorating:
For more on the pallet pumpkin see the post here.
It's that time of year again. In Canada, Halloween and Thanksgiving are in the same month, so Fall/Thanksgiving decorations are only put up for a very short period of time. I seem to focus more on Halloween, but decided I needed a Fall crafting blitz.
Here is my Fall fireplace mantel. Yes, it's a fake fireplace, we didn't inherit a real one with the purchase of this house *sigh*.
Here are the close-ups of the mantel (from left to right:
Dollar store pumpkins/gourds in the Hurricane lamp and the metal bird cage.
Dollar store foliage garland and Michael's 60% fake mums (5 bunches @ $1.11 ea.)
This cool rattan or corded raffia pumpkin was a new purchase from HomeSense (similar to the U.S. HomeGoods). I have been waiting 8 years for a HomeSense to FINALLY open in my town. It's been 3 weeks and I have been there more then a dozen times.
Now for the DIY bits:
A while back, my mother-in-law purchased two standing plaques at a discount store for me to re-craft. I Mod Podge'd burlap over the base of one and then added cardstock letters which were in the Dollar bin at Michael's. The Leaf charms are from my card making stash.
This dollar store pumpkin was covered in pages from an old Dictionary that is used just these kind of crafts. (I think it was hubby's dictionary in High School - ya, that's definitely not up to date, can you imagine the World Map section *laugh*
I tore the dictionary paper into strips and adhered it to the dollar store plastic pumpkin with Mod Podge. I tucked the top of the paper under the removable plastic pumpkin stem.
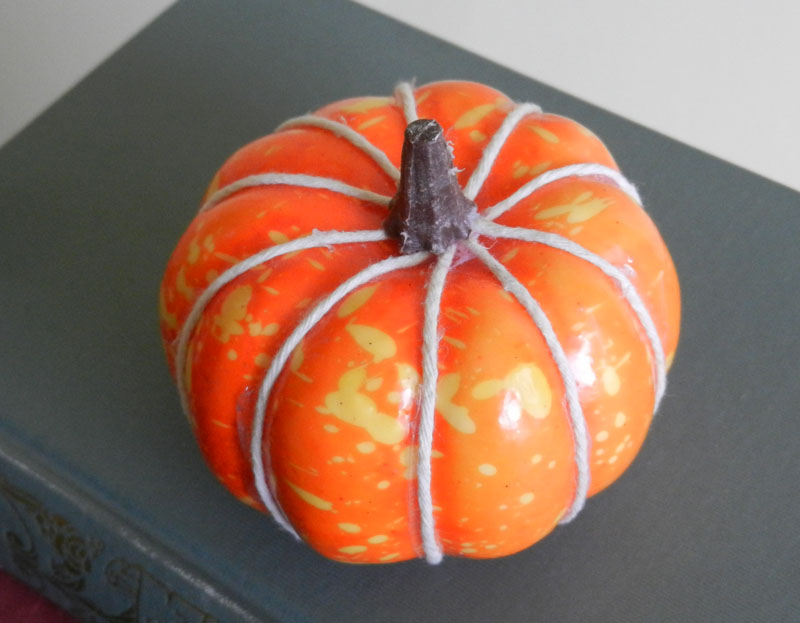
This pumpkin was from the Dollar Store gourd package.
I tucked the start of the twine under the plastic removable stem and then wrapped the twine along the seems of the pumpkin.
Tucking and hot gluing the end again under the stem.
I used some left over letters from the above "Fall" signage and glued them to a cork covered piece of 1 x 6 (cut down to 1 x 3) from my wood stash.
Some more Fall decorating:
For more on the pallet pumpkin see the post here.
Saturday, 5 September 2015
Decor on a Dime
We bought my daughter a new bed spread set last year, but never got around to decorating her room. Since we had some spare time last weekend, we decided to do some decorating on the cheap.
A girlfriend of mine had made Hannah a paper craft name frame when she was a toddler. I decided to "case" the design, but update the colours according to the new colour scheme. This was even cheaper then a dime to make since I re-purposed the frame from the original original sign and had all the embellishments on hand already for card making.
The older sign is now put away in a scrapbook.
Sorry these are blurry, camera issues!
My daughter also had some ceramic Bugs that have been on her wall since she was a baby. Her and I painted them to match.
I up dated the "H" that has been on her wall for years. So lots of not so "new" decor is updated to match her colour scheme.
I'll be working on her new curtains over the long weekend. I may even have enough fabric to make a bed skirt.
A girlfriend of mine had made Hannah a paper craft name frame when she was a toddler. I decided to "case" the design, but update the colours according to the new colour scheme. This was even cheaper then a dime to make since I re-purposed the frame from the original original sign and had all the embellishments on hand already for card making.
Sorry these are blurry, camera issues!
My daughter also had some ceramic Bugs that have been on her wall since she was a baby. Her and I painted them to match.
I up dated the "H" that has been on her wall for years. So lots of not so "new" decor is updated to match her colour scheme.
I'll be working on her new curtains over the long weekend. I may even have enough fabric to make a bed skirt.
Subscribe to:
Posts (Atom)